loading... Salesforce Cat

Monday, November 24, 2014

Render Visualforce Page As a Word Document

Normally we use Visualforce pages to generate online forms and pages but lately I met with a requirement where Visualforce page should be rendered as an downloadable word document.So in the post I thought of sharing simpler version of my code as some of you may find it useful.

So lets get into work Although you may think rendering a page as a Word document may involve lot of  work all you have to do is add one attribute to <apex:page> tag. That attribute is contentType.

eg:contentType="application/msword#SalesforceCat.doc"

In above example

  • application/msword# means page should be rendered as word document
  • SalesforceCat.doc   means default name of the downloaded document would be SalesforceCat
When you are rendering Visualforce page as a word document please take below points also into consideration
  • Some Visualforce  native page elements such as <apex:pageblock>, <apex:pageblockSection> doesn't have same styling effect on pages rendered as Word document. Therefore it is better you can use standard html tags and do the styling using inling css or  css classes defined within the page.
  •  <Apex:form> or other child  apex form components do not render in document mode therefore use html form elements if your document need to include form components such as radio buttons and text fields..

Visualforce Page Rendered as  Word Document


   Code of the above given Visualforce Page


 <apex:page applyHtmlTag="true" showHeader="true" contentType="application/msword#SalesforceCat.doc"  >  
   <div>  
   <h3>Applicant Refree FeedBack From </h3>  
   </div>  
    <head>  
     <style>   
       body { font-family: 'Arial Unicode MS'; }  
       .caption {  
          background: #cfeef8;  
          height:30px;  
          font-size:15px;;  
          margin-left: -1px; /* Fix FF 1px issue */  
         }  
       .Question  
       {  
        height:30px;   
        background-color:#efefef;   
        border:1px solid #ccc;   
        padding:2px 2px; width:50%;  
       }  
       .Answere  
       {  
         height:30px;    
         border:1px solid #ccc;   
         padding:3px 2px 3px 4px;  
       }    
       .rowstyle {  
        height:50px;  
       }  
       .rowstyle td{width:30%;}  
     </style>  
   </head>  
   <apex:outputPanel >  
   <table border="0"  cellspacing="0" cellpadding="0" id="resultTable" width="100%">  
    <caption style="background: #cfeef8;height:23px;font-weight: bold;font-size: 16px; margin-left: -1px; text-align:left; padding:0 0 0 4px;">Feed Back Questions</caption>  
    <tr>  
    <th class="height:30px; background-color:#efefef; border:1px solid #ccc; padding:2px 2px; width:50%;" >Answere All the Questions</th>  
    </tr>  
    <tr >  
     <td class="Question">  
     <apex:outputLabel value="Radio Button Type Question? ">  
     </apex:outputLabel>  
     </td>  
     </tr>  
     <tr>  
     <td class="Answere">  
       <apex:outputPanel >  
        <input type="radio" name="group1" value="Poor"/> Poor  
        <input type="radio" name="group1" value="Average"/> Average  
        <input type="radio" name="group1" value="Good"/> Good  
        <input type="radio" name="group1" value="Excellent"/> Excellent  
       </apex:outputPanel>  
     </td>  
    </tr>  
    <tr>    
    <td width="400" class="Question">  
     <apex:outputLabel value="Check Box Type Question? ">  
    </apex:outputLabel>  
    </td>  
    </tr>  
     <tr>  
     <td style="height:30px;  border:1px solid #ccc; padding:3px 2px 3px 4px;">  
       <apex:outputPanel >  
         <input type="checkbox" name="vehicle" value="Bike">I have a bike </input>  
         <input type="checkbox" name="vehicle" value="Car">I have a car  </input>  
         <input type="checkbox" name="vehicle" value="Bike">I have a van </input>  
         <input type="checkbox" name="vehicle" value="Car">I have a lorry </input>  
       </apex:outputPanel>  
     </td>  
    </tr>   
    <tr>    
    <td width="400" class="Question" >  
    <apex:outputLabel value="Select List Type Question? ">  
    </apex:outputLabel>  
    </td>  
     </tr>  
     <tr>  
     <td style="height:30px; border:1px solid #ccc; padding:3px 2px 3px 4px;">  
       <apex:outputPanel >  
         <select value="select">  
         <option value="volvo">Volvo</option>  
         <option value="saab">Saab</option>  
         <option value="mercedes">Mercedes</option>  
         <option value="audi">Audi</option>  
        </select>  
       </apex:outputPanel>  
     </td>  
    </tr>    
   </table>  
   </apex:outputPanel>  
    <table width="100%">  
    <tr>  
     <td class="Question">  
      <b>Referee Name</b>  
     </td>  
     <td class="Question">  
      <input type="text" size="35" />  
     </td>  
    </tr>  
    <tr>  
     <td class="Question">  
     <b>Contact Number</b>   
     </td>  
    <td class="Question">  
      <input type="text" size="35" />  
     </td>  
    </tr>  
     <tr>  
     <td class="Question">  
     <b>Date</b>  
     </td>  
     <td class="Question">  
      <input type="text" value="(Enter in DD/MM/YYYY Format" size="35" />  
     </td>  
    </tr>  
    </table>  
 </apex:page>  

Sunday, November 16, 2014

Salesforce Access All Object List Views From Visualforce

Salesforce standard list views are one of the most useful built in features comes with the platform.They serve well for users reporting and filtering needs.Although Salesforce standard list views are great to provide end users access to them you have to either create tab for each of your objects or built custom Visualforce pages with <apex:Listviews> tag for each of your objects.Although above solutions work fine for org with limited number of objects as the number of objects grow you may find it bit unpractical.

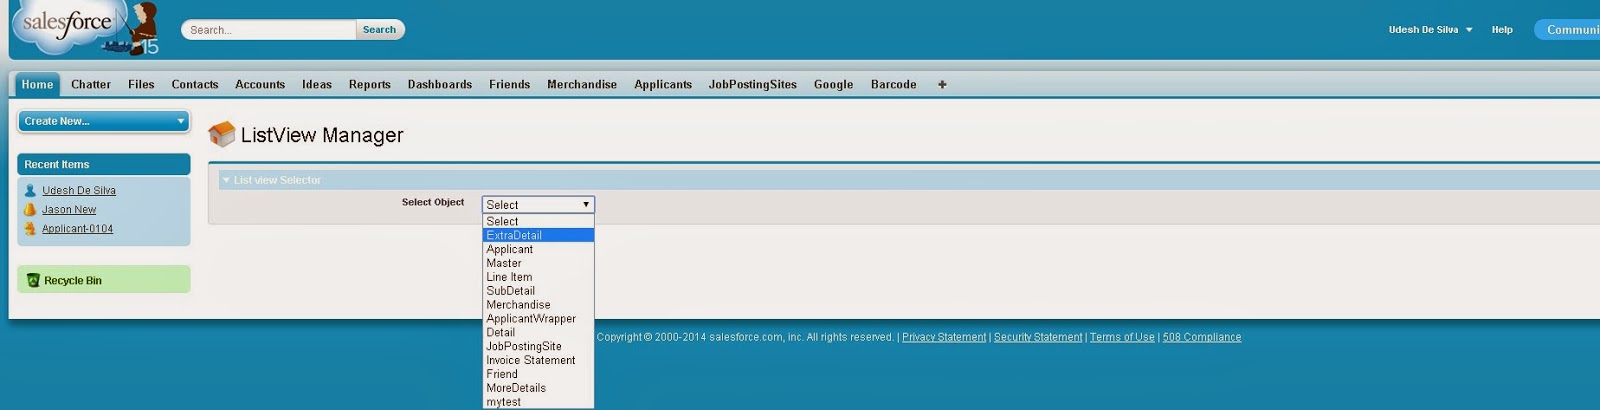
In this post I am going to describe you how you can access all the custom object list views via one Visualforce page using Salesforce meta data api.


For this purpose i have created a Visualforce page named  ListViewManager and an Apex controller named
ListviewController.

ListviewController


 public class ListviewController {  
   public List<SelectOPtion> Objectlist {get;set;}  
   public String Selectedview {get;set;}  
   public String objectName {get;set;}  
   Map<String,String> prefixtoName {get;set;}  
   public ListviewController()  
   {  
     Objectlist = new List<SelectOption>();  
     prefixtoName = new Map<String,String>();  
     Objectlist.add(new SelectOption('','Select'));  
     //get all object meta details using meta data api  
     Map<String, Schema.SObjectType> gd = Schema.getGlobalDescribe();  
     for(String sObj : gd.keySet()){  
       //get details of each object  
       Schema.DescribeSObjectResult r = gd.get(sObj).getDescribe();  
       //get only custom object with key perfix, there are some internal standard objects without key       //prefix. If you want standard objects also considered you must check them by name as all         //standard objects does't have list views  
       if( r.getKeyPrefix() != null && r.getKeyPrefix()!='' && r.getName().contains('__c'))  
       {  
        //Create a list of selectoptins with keyprefix as value and object label as label of selectoption  
        Objectlist.add(new SelectOption( r.getKeyPrefix(),r.getLabel()));  
        //maintain a map of keyprefix to object name  
        prefixtoName.put(r.getKeyPrefix(), r.getLabel());   
       }  
     }  
   }   
  public void callServer()  
  {  
   //get label of selected object  
   objectName = prefixtoName.get(Selectedview);  
  }  
 }  


ListViewManager

 <apex:page controller="ListviewController" >  
  <apex:Form >  
  <apex:SectionHeader title="ListView Manager"/>  
  <apex:pageblock id="ViewBlock" >  
   <apex:pageMessages ></apex:pageMessages>  
   <apex:pageblockSection title="List view Selector" >  
    <apex:pageblockSectionItem >  
    <apex:outputLabel value="Select Object"/>  
    <apex:SelectList value="{!Selectedview}" size="1">  
     <apex:SelectOptions value="{!Objectlist}"/>  
     <apex:actionSupport event="onchange" action="{!CallServer}" rerender="ViewBlock"/>  
    </apex:SelectList>  
    </apex:pageblockSectionItem>  
    <apex:outputLink value="/{!Selectedview}" target="_blank" rendered="{!objectName!= null && objectName!=''}">{!objectName}  List view </apex:outputLink>  
   </apex:pageblockSection>  
   </apex:pageblock>  
  </apex:Form>  
 </apex:page>  
.

  • drop-down lists the all custom object names in your org


  • Select the name of the object you want to access the list view of.


  • Upon selection of the object ,page will provide you with a link to access the standard list view


Thursday, November 6, 2014

Salesforce History Tracking :Access Field History From Apex Code


In my last post Salesforce History Tracking - Step by Step Guide I discussed in detail about enabling history tracking on a custom object and viewing those logs using Salesforce reports and History tracking related list.In this post I am going to discuss how field tracking logs can be accessed from Apex code.

Salesforce maintains separate internal object to maintain history logs for each history tracking enabled object.The naming of these tables follows a simple convention so should be easy to find. For standard objects the name of the history table follows the format: '<ObjectName>History' so for the Account object the history table is AccountHistory.

For custom objects the name of the convention simply replaces the 'c' on the end of the API name with 'History'. So, for a custom object call My_Object__c the history table is called My_Object_History.

All history tracking tables has following fields.


  • ParentId : This is the Id  of record this history tracking log is related to (id of record field modification happend)
  • Field      :  API name of the modified field.
  • OldValue : Field value prior to the modification.
  • NewValue : Field value after modification
  • CreatedById : Id of the User who made the modification. 
History Tracking logs can be queried via SOQL as shown below

Query all field modification logs of a custom object called  My_Object__c

 Select Id,Field,CreatedById ,OldValue,NewValue,EditedBy From My_Object__History  

Query All field modification logs related to a field called My_Field__c of My_Object__c


 Select Id,Field,CreatedById ,OldValue,NewValue,EditedBy From Friend__History   
 Where Field ='My_Field__c'  


Query  All field modfication logs related to a particular record

 
 Select Id,Field,CreatedById ,OldValue,NewValue,EditedBy From Friend__History   
 Where ParentId=:RecordId   


Using SOQL to query history logs you can build your own Visualforce pages to display field modification details to the end users. 

Sunday, October 26, 2014

Salesforce History Tracking - Step by Step Guide

One of the advantages of working on a cloud platform like Salesforce is some really cool and important functions comes inbuilt and only we have to do is setting up those according to your requirements.One such feature is Salesforce History Tracking.

History tracking is the Salesforce way of monitoring and auditing the changes done to data (object records) by the users. In any business monitoring and auditing data changes is important for security and administrative purposes.In this article I am going to discuss how to enable history tracking on a Custom object and how to monitor the changes done by the users to records of history tracking enabled object.

To learn more refer Salesforce History Tracking

1. Go to the object you want to track history - here my object is Friend.


 2. Click on the Edit button and scroll down to Optional Features section and tick  following options

  • Track Field History
  • Allow Reports


3. Now on top of your Custom Field List  you can see a new button Set History Tracking. Click on it and Select the Fields on the object you want monitored. You are only allowed to track maximum of 20 fields so choose wisely :)


Now we are done with Setting up the object for history tracking. This point  forward any changes made to the  tracking enable fields of the object will be logged by Salesforce. Our next task is to create a report on those logs. so we can view those tracking details.

4. Click on the plus (+) on your tab list .


5. Scroll to Reports link and click on it.


6. Click New Report


7. Then Select the Report Type .This should be  "< your object name>  History". Since my object is Friend , reporting Type is "Friend History".

  • If reporting type is not available please check you have enabled Allow Reports option on your object
  • Reporting Type is not created for Detail objects of Master - Detail relationship so please make sure your object (History Tracking enabled) is not a detail object of a master -Detail relationship.
8. Click on Create


Parent ID field appearing in the history records is the Salesforce ID of the actual record to which that history record is related.


9. Customize the report according to your requirements and click on Save  

  • Give a name to your report
  • Select the Folder you want to save the report based on who you want to allow to access the report
  Now we are done.


10. Then you can run the report to see the details


11.  Optionally you can add History tracking related list to your page layout (just click related lists and drag and drop <object Name> History  list to your layout and Save the layout).Since it will show the field tracking details to the all the users who has read access to the records it is not the best idea but it depends on your Application's requirement and data sensitivity.


important points to note

  • History tracking starts from point you enable history tracking. No changes prior to enabling history tracking won't be available..
  • Changes to Fields with more than 255 characters are tracked as Edited. Their old and new values are not recorded.
  • Cannot create History report on Custom objects which has  master-Detail relationships.
  • If you disable history tracking for custom object, you cannot report on its  field history.

Sunday, October 19, 2014

Salesforce Transaction Control

A transaction is a unit of work that you want to treat as "a whole". It has to either happen in full, or not at all.When it comes to maintain consistency and integrity of data ,Transaction Control is of paramount importance. Transaction control ensures the data changes done in failed operations do not modify the state of your database while changes done by successfully completed operations are reflected in the database.

Salesforce Transaction control is means of enforcing the above concept to your apex code which executes on Salesforce servers.In Salesforce you can do this with two simple methods.
  1. Savepoint sp = Database.setSavepoint(); - marks the beginning of your transaction and also the point  to database should revert in case the operation fails.
  2. Database.rollback(sp); - undo any changes you have done to the database after the passed save point. This methods takes a save point as a parameter and roll back all the database changes done after the passed save point.
example of  using above methods in code
 // variable initialization   
  // your custom validation logic   
  Savepoint sp = Database.setSavepoint(); // should be before any dml statements that you intend to be undone if the operation fails   
  try   
  {   
  // your dml statements and other logic   
  }   
  catch(Exception e )   
  {   
   //oops something bad happen before opertion completed   
  Database.rollback(sp); //undo any dml change done after setting the save point.   
  }   

you can find more about Salesforce Transaction Control Here

One important point to note is Id values of Sobject records save after save point are not cleared on rollback.Attempting to insert the sObject using the variable created before the rollback fails because the sObject variable has an ID. Updating or upserting the sObject using the same variable also fails because the sObject is not in the database and, thus, cannot be updated.So it is important you reinitialize your sobjects after rollback else it will generate DML exceptions on subsequent operations such as

  • Record ID: cannot specify Id in an insert call 
  • Record does not exist


Friday, October 17, 2014

Salesforce Record Deletion

In this post I am going to discuss Salesforce record deletion process.In Salesforce once record are deleted those records are moved to the recycle bin and they are no longer accessible through the  SOQL queries or Salesforce standard views.Deleted records are maintained in the recycle bin of 15 days (earlier it was 45 but seems Salesfore has reduced the duration)
refer below link for more details

Salesforce Deleting Records

for more details about recycle bin refer

Salesforce Recycle Bin

All though normal SOQL queries do not return deleted records you can make SOQL queries include deleted records in results by adding "ALL ROWS" keyword at the end of your query.But it is important that you be careful when performing DML operations with such results because the results include deleted records.

example - using ALL ROWS in SOQL

[SELECT COUNT() FROM Contact WHERE AccountId = a.Id ALL ROWS];

In addition to above  approach if you want to explicitly query deleted records only ,you can use "IsDeleted" Standard attribute.

example - using IsDeleted in SOQL

[SELECT Id, Name FROM Account WHERE IsDeleted=true];

Tuesday, October 14, 2014

Scheduling Your Apex Classes Via Script

One of the most tedious tasks I face during deployment of my code to QA and Production orgs is the removing the scheduled classes and rescheduling them after the release  is completed.As the number of scheduled classes grows this becomes more and more difficult and prone to error as the possibility of  forgetting to reschedule some classes grows.

As I was on the look out  for a solution I found  that classes can be scheduled via apex and I tried writing a script to schedule my classes and to my luck It worked as i expected.As I thought there may be at least few of you who has faced the same issue I thought of sharing my code. Please note that this code may not be directly serve your purpose and will need some tweaking. But it will give you the basic idea of how classes can be scheduled via apex.


list<ApexClass> listClasses;
//create a string list and add the Names of classes you want to schedule
//please note that all of these classes must implement schedulable Interface
List<String> ClassesToBeScheduled = new List<String>(); ClassesToBeScheduled.add('FirstSchedule'); ClassesToBeScheduled.add('SecondSchedule'); ClassesToBeScheduled.add('ThirdSchedule'); ClassesToBeScheduled.add('FouthSchedule');

//query the salesforce apexclass object to get the records of classes you want to //schedule
for(ApexClass ac:[Select Id Name From ApexClass where Name IN:ClassesToBeScheduled]) { String className = ac.Name; String sch ='0 0 4 ? * * 2014'; // expersion specify how class is scheduled
//here the class is scheudled to run at 4.00 AM every day till the end of 2014
// you can learn all about schedule expressions here
Type t = Type.forName(className);

//schedule the class by passing 
//1.jobName - any string (here I use class name)
//2.schedule frequncy - string experssion specify when and hoe often each class //is run
//3.Instance of the class to be scheduled System.schedule(className, sch, (Schedulable)t.newInstance()); }

You can then run your script using developer console.